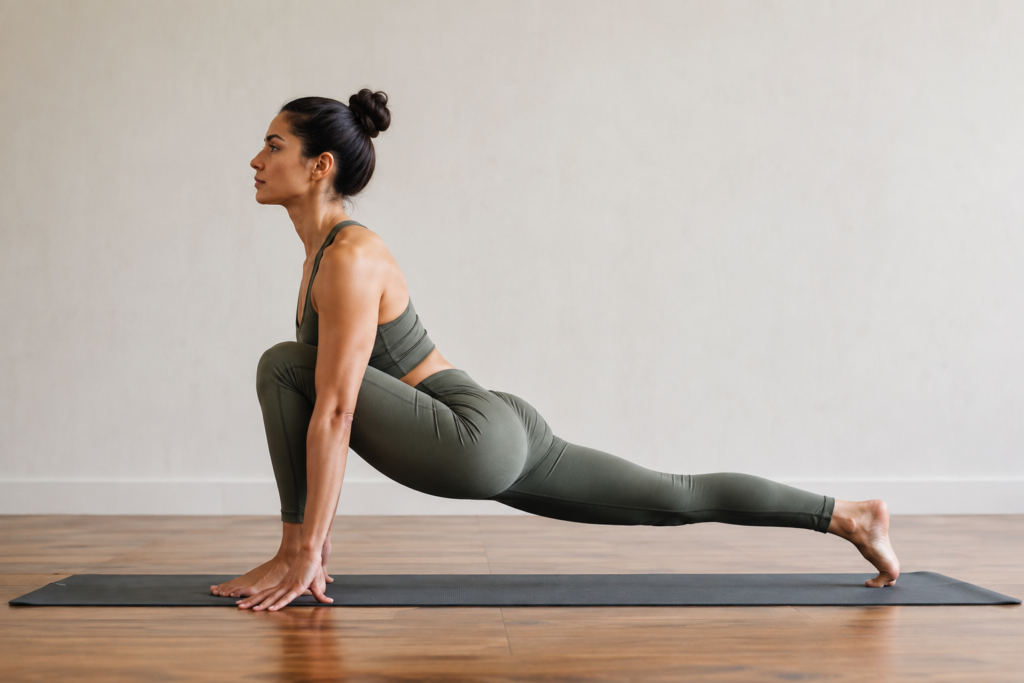
Utthan Pristhāsana, commonly known as Lizard Pose, is a deep yoga posture that works on the hips, groins, hip flexors, and legs. The pose begins from a wide lunge with both hands placed inside the front foot. From there, practitioners can choose different variations depending on their mobility, strength, and experience.
Lizard Pose can be practiced with the back knee lifted or lowered, with the hands on the floor or blocks, or with the forearms supported. More advanced variations introduce twisting, quad stretching, and even arm balancing.
Because the posture can create a strong sensation around the hips and inner thighs, it is important to approach it progressively. A well-supported Lizard Pose with steady breathing can be far more useful than forcing the body into its deepest variation.
For practitioners of Hatha Yoga, Utthan Pristhāsana is particularly useful because it combines mobility, strength, stability, breath awareness, and conscious alignment in one posture.
What is Utthan Pristhāsana?
The Sanskrit name Utthan Pristhāsana is commonly translated as Lizard Pose. It is a low, wide lunge in which the front foot moves outside the corresponding hand.
The posture creates a combination of movements through the hips and legs:
- The front hip moves into flexion.
- The front leg works through the hamstrings and adductors.
- The back hip moves toward extension.
- The back leg receives a stretch through the hip flexors and quadriceps.
- The pelvis needs to remain organised while the upper body creates stability.
The pose can therefore feel quite different depending on the variation being practiced.
A supported version with the back knee on the floor can provide a relatively accessible hip-opening experience. A version with the back knee lifted and the forearms supported demands considerably more strength and control.
How to do Lizard Pose:
Start from downward-facing dog
Begin in Adho Mukha Śvānāsana (Downward-Facing Dog).
Take a few breaths and establish a steady foundation through your hands and feet.
Bring your right foot forward and place it outside your right hand.
If the foot does not reach the desired position in one movement, use your hand to guide it forward. Place the front foot far enough forward that the knee can remain relatively comfortable above the ankle.
Keep both hands inside the right foot.
Choose your back-leg position
You can practice Lizard Pose with the back knee lifted or lowered.
For the lifted-leg variation, keep the toes tucked and extend the heel toward the back of the mat. This creates a more active posture and requires greater engagement through the legs and core.
For a gentler variation, lower the back knee to the floor and uncurl the toes. Place a folded blanket underneath the knee if additional support is needed.
The supported variation can be particularly useful for beginners or practitioners working with limited hip mobility.
Keep the front knee organised
Allow the front knee to bend while keeping it aligned generally toward the second or third toe.
The knee does not need to remain perfectly vertical over the ankle in every variation, but avoid allowing it to collapse inward.
The front foot should remain grounded, with awareness through the heel and the base of the toes.
Stay on your hands or lower to the forearms
The simplest version keeps both hands on the floor.
Maintain length through the spine and allow the chest to move forward rather than dropping heavily toward the floor.
If your mobility allows and the spine remains long, you can lower onto your forearms.
Forearms on the floor create a deeper variation for many practitioners. However, deeper does not always mean better. If lowering down causes the spine to round or the lower back to pinch, stay on your hands or use blocks beneath the forearms.
Breathe and observe
Once you find a stable position, breathe slowly.
Stay for approximately 5 to 10 steady breaths, or around 30 to 60 seconds if the variation feels comfortable.
Rather than trying to force the hips lower, allow the body to gradually settle with each exhalation.
Then carefully return to Downward-Facing Dog and repeat on the opposite side.
What muscles does Lizard Pose stretch?
Lizard Pose creates movement across several major muscle groups.
Front leg
The front leg receives work through the:
- Adductors
- Hamstrings
- Gluteal muscles
- Hip stabilisers
The wide position of the front leg can create a strong sensation through the inner thigh and groin.
Back leg
The back leg can experience a significant stretch through the:
- Hip flexors
- Psoas
- Rectus femoris
- Quadriceps
Keeping the back knee lifted creates more active muscular engagement, while lowering the knee allows the practitioner to focus more directly on the hip-opening aspect of the posture.
Core and upper body
The upper body also contributes to the posture.
When practicing on the hands, the shoulders and arms provide stability while the core supports the pelvis and spine.
When moving onto the forearms, the demands change. The shoulders and upper back need to stabilise the body while the trunk remains organised.
Benefits of Lizard Pose
Lizard Pose is commonly included in yoga sequences designed to develop hip mobility and prepare the body for more demanding postures.
Supports hip mobility
The wide stance creates space for movement around the hips and inner thighs.
Regular, mindful practice can help practitioners explore their available range of hip movement while maintaining greater awareness of the pelvis.
Stretches the hip flexors
The back leg position can create a noticeable stretch through the front of the hip.
This can be particularly useful within a sequence after periods of sitting, although the intensity should always remain appropriate for the individual practitioner.
Works the inner thighs
The wide front-leg position places the adductors under considerable demand.
This makes Lizard Pose useful as preparation for other poses that require greater hip mobility, including Hanumānāsana (Splits).
Builds stability
Lizard Pose is not purely a stretching posture.
The lifted-back-leg variation requires active engagement through the legs, hips, shoulders, and core.
The practitioner needs to create stability while simultaneously exploring mobility.
Prepares the body for advanced poses
With consistent practice, different Lizard variations can become preparation for more demanding postures.
These may include:
- Hanumānāsana
- Deeper hip-opening variations
- Backbends
- Arm balances
- Flying Lizard
The preparatory work should always match the practitioner’s current level of mobility and strength.
Lizard Pose and hip mobility
Hip mobility is one of the main reasons practitioners include Utthan Pristhāsana in their yoga practice.
However, hip mobility involves more than simply trying to move the pelvis closer to the floor.
The hip joint, pelvis, surrounding muscles, and individual skeletal structure all influence the range available to a practitioner.
This is why two people can practice the same Lizard Pose and experience completely different sensations.
One person may naturally move deeper into the posture. Another may need blocks, a higher hand position, or a wider stance.
Both can practice effectively.
The goal is to work with the movement available in your own body rather than comparing the shape with someone else’s.
How to use props in Lizard Pose
Props can make Lizard Pose more accessible and help maintain better alignment.
Blocks under the hands
If your hands cannot comfortably reach the floor while keeping your spine long, place yoga blocks underneath them.
This creates additional height and allows you to maintain length through the torso.
Blocks under the forearms
If you want to explore the forearm variation but cannot comfortably reach the floor, place blocks beneath your forearms.
This allows you to experiment with greater depth without forcing the spine to collapse.
Blanket under the back knee
A folded blanket can provide additional cushioning when practicing with the back knee lowered.
This is particularly useful on firm surfaces.
Props are not a sign that you need an easier practice. They are tools that help you organise the posture according to your current mobility.
Common mistakes in Lizard Pose
Forcing the hips toward the floor
One of the most common mistakes is trying to make the hips lower before the body is ready.
This can create unnecessary strain around the hips or lower back.
Instead, maintain a long spine and allow the posture to develop gradually.
Letting the front knee collapse inward
The front knee should generally track in the direction of the toes.
If it repeatedly moves inward, reduce the depth and focus on creating better stability through the foot and hip.
Rounding the spine
Going deeper is not useful if the spine collapses.
If lowering toward the floor causes your back to round significantly, raise your hands onto blocks or remain on straight arms.
A longer spine often creates a more productive experience than forcing the forearms to the floor.
Losing awareness of the back leg
The back leg contributes to the posture even when the main sensation appears to be around the front hip.
In the lifted variation, actively reach the heel backward and keep the leg engaged.
In the supported variation, allow the back knee to rest comfortably while maintaining length through the front of the hip.
Preparatory poses for Lizard Pose
Lizard Pose can be introduced after the body has been adequately warmed.
A few useful preparations include:
Low Lunge
Anjaneyāsana (Low Lunge) introduces the hip extension required in the back leg while gradually opening the front of the hip.
Half Splits
Ardha Hanumānāsana (Half Splits) prepares the hamstrings and helps develop awareness of the relationship between the pelvis and front leg.
Sun Salutations
Several rounds of Sūrya Namaskāra can warm the shoulders, hips, legs, and spine before moving into deeper lunges.
Gentle quad and hip-flexor work
Supported quad stretches can prepare the front of the back leg for deeper variations of Lizard Pose.
The goal is to prepare the body gradually rather than using Lizard Pose as the first deep stretch of a practice.
Lizard Pose variations
Supported Lizard Pose
Lower the back knee and place blocks under the hands.
This is an excellent starting point for practitioners developing hip mobility.
Forearms on blocks
Keep the back knee down and bring the forearms onto blocks.
This provides a deeper experience while keeping the upper body supported.
Twisted Lizard Pose
From Lizard Pose, rotate the torso toward the front leg.
This introduces spinal rotation while maintaining the hip-opening foundation of the posture.
Quad-bound Lizard Pose
In a deeper variation, bend the back knee and reach the corresponding hand toward the foot.
This adds a strong quadriceps and hip-flexor component.
Because this variation combines several demanding movements, it should be approached progressively.
Flying Lizard
Flying Lizard is an advanced arm balance that develops from the foundation of Lizard Pose.
It requires considerable hip mobility, upper-body strength, balance, and coordination.
Practitioners should establish the basic posture and its supported variations before attempting the arm balance.
Lizard Pose and the lower back
Some practitioners feel Lizard Pose primarily in the hips, while others notice the lower back becoming involved.
This can happen when the pelvis tips forward excessively or when the practitioner tries to create more depth by arching the lumbar spine. A useful approach is to think about creating length through the spine while allowing the hips to move within their available range.
If you feel a pinching sensation in the lower back, reduce the depth, raise your hands onto blocks, or lower the back knee.
The sensation should remain within a manageable stretching or muscular effort rather than becoming sharp or painful.
When should you modify Lizard Pose?
Lizard Pose can place substantial demands on the hips, knees, wrists, and lower back.
Practitioners should modify the posture when dealing with:
- Knee pain or injury
- Hip pain
- Lower-back problems
- Wrist discomfort
- Recent surgery or injury
- Significant mobility restrictions
For pregnancy, the pose may require substantial modification because of the changing abdominal space and balance demands. A trained prenatal yoga teacher can help determine appropriate variations.
Sharp pain, numbness, tingling, or persistent discomfort are signals to come out of the posture.
Lizard Pose and Hatha Yoga
Lizard Pose fits naturally into a Hatha Yoga practice because it encourages a balance between physical effort and awareness.
The posture can be used to study the relationship between mobility and stability.
The front leg explores hip movement.
The back leg creates length through the front of the hip.
The upper body provides support.
The breath gives the practitioner a continuous point of awareness.
This approach reflects an important principle of yoga practice: the objective is not simply to achieve an impressive shape. The posture becomes a means of developing awareness of the body, breath, and mind.
For students undertaking a Hatha Yoga course, Lizard Pose can also demonstrate how one posture can be adapted for different bodies through variations and props.
Lizard Pose and meditation
Although Lizard Pose is a physical asana, it can also prepare the body for quieter practices.
Deep hip-opening postures are often followed by more comfortable seated positions. Once the body has moved through a sequence of active and mobility-focused asanas, it may become easier to settle into stillness.
This transition can lead naturally toward:
- Prāṇāyāma
- Mantra chanting
- Meditation
- Sound meditation
- Nāda Yoga
In this way, the physical practice becomes part of a broader yoga experience rather than an isolated stretching routine.
Lizard Pose and Nada Yoga
Nāda Yoga focuses on sound, listening, and the development of subtle awareness.
Lizard Pose itself is not a Nada Yoga practice, but it can form part of a sequence that prepares the body for seated sound meditation.
After completing a physical practice, a practitioner may move into a comfortable seated position and begin observing the breath, chanting a mantra, or listening to a Tanpura drone.
For students exploring Nada Yoga teacher training, this relationship between physical preparation, breath, sound, and meditation can be particularly valuable.
The body does not need to be treated separately from the rest of the practice. Asana can create the stability needed for deeper attention.
Lizard Pose and sound healing
Yoga and sound-based practices can also complement one another within a broader session.
A gentle Hatha Yoga sequence may prepare the body before a period of sound meditation or a sound bath. After movement, practitioners can settle into a supported position and allow their attention to shift toward sound.
For those interested in developing a deeper understanding of these practices, a sound healing teacher training course in Rishikesh can provide an opportunity to study sound within a broader yogic and contemplative environment.
The role of Lizard Pose in such a sequence remains physical and preparatory. It should not be presented as a sound-healing treatment in itself.
A simple Lizard Pose sequence for beginners
If you are new to Lizard Pose, begin with a supported variation.
Start in Downward-Facing Dog and step the right foot outside the right hand. Lower the left knee to the mat and place a blanket underneath it if needed. Keep both hands on blocks and maintain a long spine. Take five slow breaths. Notice the sensation around the right hip and inner thigh without trying to force the pelvis downward. Then step back to Downward-Facing Dog and repeat on the other side.
As your mobility and stability develop, you can gradually explore the lifted-back-knee variation or lower the hands and forearms. Progress should come through consistent practice rather than forcing a deeper position in a single session.
How to practice Lizard Pose safely
A useful approach is to think of Lizard Pose as a process rather than a final shape. Begin with support. Create stability through the feet and hands. Organise the front knee. Keep the spine long. Allow the hips to move gradually. Use your breath as feedback. If the breath becomes strained, reduce the intensity. If you feel sharp pain, come out of the pose. If you need a block, use one. If you need to keep the back knee down, keep it down.
Yoga practice becomes more sustainable when the practitioner learns to work with the body rather than against it.
Final thoughts
Utthan Pristhāsana is a versatile yoga posture that combines deep hip mobility with strength, stability, and awareness.
Its many variations make it suitable for different levels of practice. Beginners can work with the back knee down and hands supported on blocks, while experienced practitioners may explore forearms, twists, quad binds, and advanced arm balances.
A well-organised posture with a steady breath allows you to explore mobility while maintaining awareness of the body’s limits. Over time, this approach can help prepare the hips, legs, and upper body for more demanding yoga postures while developing greater confidence in your own practice.
Within a broader Hatha Yoga, Nada Yoga, meditation, or sound-based practice, Lizard Pose can serve as a valuable physical preparation.