Gomukhāsana, commonly known as Cow Face Pose, is a seated yoga posture that combines deep hip positioning with a challenging shoulder and arm variation. The pose asks the hips and knees to move into a crossed position while the arms work in opposite directions behind the back.
This combination makes Gomukhāsana an interesting posture for developing mobility, postural awareness, and body coordination. It also teaches an important principle of yoga practice: flexibility in one part of the body does not necessarily mean that another part is ready for the same range of movement.
With the right use of props and a steady approach, Gomukhāsana can become accessible to many practitioners. A block, folded blanket, strap, or chair can help create enough space to maintain a long spine and avoid forcing the shoulders or knees.
For students exploring Hatha Yoga, the pose also offers a practical lesson in combining strength, mobility, breath, and awareness within one posture.
What Is Gomukhāsana?
The Sanskrit name Gomukhāsana comes from go, meaning cow, and mukha, meaning face. The posture receives its name from the shape created by the crossed legs and arms.
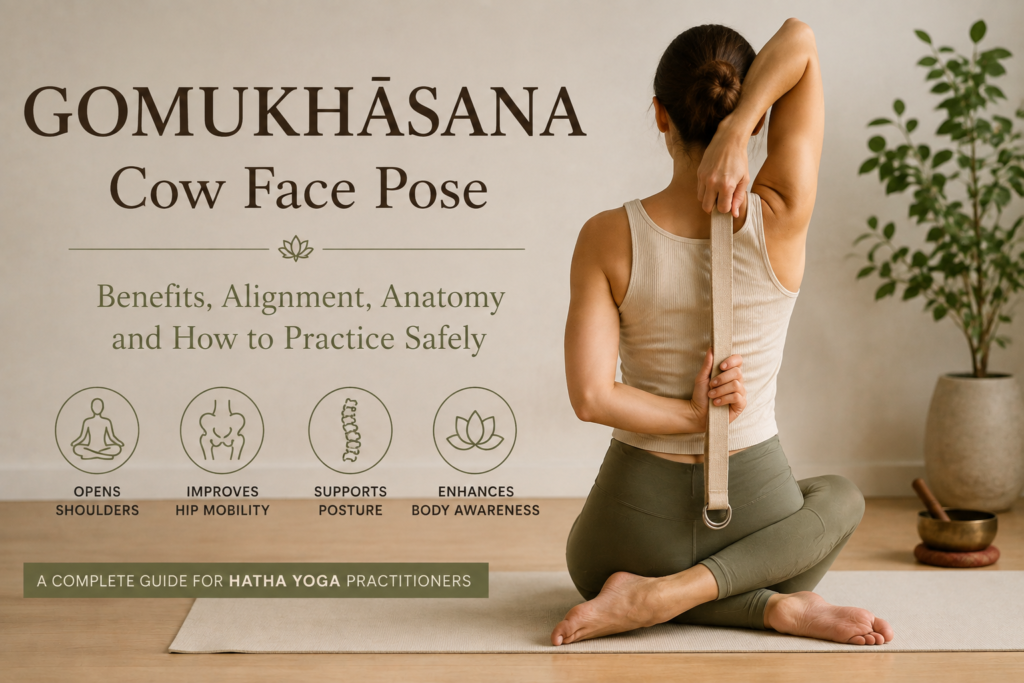
In the traditional form, one knee rests above the other while the feet move toward the opposite hips. At the same time, one arm reaches overhead and bends down the back while the opposite arm reaches upward from behind.
The hands may eventually clasp behind the back, although this is not necessary for practicing the posture effectively.
The complete shape requires considerable mobility in the hips, shoulders, and upper body. For this reason, using props is often a better approach than forcing the final position.
How to Do Gomukhāsana
Set Up the Legs
Begin seated on the floor with your legs extended comfortably in front of you.
Bend your knees and bring the feet toward the hips. Cross the right knee over the left and allow the knees to move toward the centre line of the body.
Ideally, the knees will sit one above the other. However, they do not need to stack perfectly.
Bring each foot toward the opposite hip and keep the outer edges of the feet connected with the floor. Avoid allowing the ankles to collapse inward or the feet to turn excessively.
If your pelvis moves backward or your spine rounds, sit on a folded blanket or yoga block. Raising the hips can make the leg position considerably more comfortable.
Organise the Pelvis
Once the legs are positioned, find an even base through both sitting bones.
The pelvis should remain as level as possible rather than shifting heavily toward one side.
If the knees feel excessive pressure, increase the height beneath the hips or reduce the depth of the leg position.
The purpose of the posture is not to force the knees into a particular shape. Instead, work within the available movement of the hips while keeping the knees comfortable.
Set Up the Arms
With the right leg positioned on top, bring the left arm overhead.
Bend the elbow and allow the left hand to move down behind the upper back.
Then bring the right arm behind the body from below. Bend the elbow and move the right hand upward along the spine.
If the hands meet comfortably, you can hold them together.
For most beginners, however, the hands will not meet immediately. A yoga strap can bridge the distance between the hands and allow the shoulders to experience the intended movement without forcing the joints.
Keep the head neutral and avoid pulling the arms toward each other.
Lengthen the Spine
Once the arms are positioned, lift through the chest while keeping the ribs relatively contained.
Try to maintain length through the spine rather than leaning backward or rounding forward to compensate for limited shoulder mobility.
The sitting bones should remain grounded throughout the pose.
Take several slow breaths while maintaining a steady and comfortable position.
After releasing the arms, carefully release the legs and repeat the posture on the opposite side.
How Long Should You Hold Gomukhāsana?
There is no single required duration for the posture.
For a general yoga practice, 5 to 10 slow breaths can provide enough time to explore the position without turning the pose into a test of endurance.
Beginners may prefer shorter holds, especially when working with restricted hip or shoulder mobility.
The quality of the breath is more useful than simply trying to remain in the pose for as long as possible.
If breathing becomes strained or you begin to compensate through the spine, shoulders, or knees, reduce the intensity or come out of the posture.
What Muscles Does Gomukhāsana Work?
Gomukhāsana combines several movements across the hips, knees, shoulders, and spine.
The leg position places the hips into flexion and adduction while the knees remain deeply flexed. The crossed-leg position also challenges the outer hip tissues and requires control around the pelvis.
The upper-body position creates a very different movement pattern on each side.
The overhead arm moves into shoulder flexion while the elbow bends. The lower arm moves behind the body into shoulder extension and internal rotation.
This makes Gomukhāsana a useful posture for exploring asymmetry.
You may discover that one shoulder moves comfortably into the overhead position while the opposite shoulder feels more restricted. The same can happen with the hips and legs.
Gomukhāsana and the Shoulders
The shoulder position is one of the most recognisable features of Cow Face Pose.
The overhead arm requires shoulder flexion combined with external rotation and elbow flexion. This can create a stretch through areas including the long head of the triceps, latissimus dorsi, and posterior shoulder.
The lower arm moves into shoulder extension and internal rotation. This can create a stretching sensation around the front and upper portions of the shoulder.
Because the two arms perform very different actions, Gomukhāsana can reveal differences in shoulder mobility from one side to the other.
Allow the Shoulder Blades to Move
A common mistake is to try to force the arms into position by pulling aggressively on the hands.
The shoulder blades need to move naturally as the arms change position.
Allowing appropriate scapular movement can help distribute the range of motion across the shoulder complex instead of forcing excessive movement into the glenohumeral joint.
If the shoulder feels pinched at the front, reduce the intensity and use a strap.
Gomukhāsana and the Hips
The crossed-leg position places both hips into a combination of flexion and adduction.
The outer hip and gluteal tissues experience a significant demand as the legs cross toward the midline. The position can feel particularly intense for practitioners with limited hip mobility.
However, the sensation should remain within a comfortable range.
A strong stretch around the outer hip can be expected. Sharp or localised pain around the knee is a different matter and should be treated as a signal to modify the position.
Why Sitting Higher Can Help
One of the simplest modifications for Gomukhāsana is to sit on a block or folded blanket.
Elevating the pelvis can make it easier to maintain an upright spine and reduce the amount of movement required at the hips.
This can also make the posture more manageable for practitioners who experience discomfort when trying to sit directly on the floor.
Props are particularly useful in Hatha Yoga because they allow students to explore the principles of a posture without forcing their bodies into its most demanding version.
Benefits of Gomukhāsana
Gomukhāsana is commonly practiced for its effects on the shoulders, hips, posture, and body awareness.
Opens the Shoulders and Chest
The arm position creates movement through the shoulders and can provide a useful counterbalance to prolonged sitting and activities that keep the arms forward.
The overhead arm works through shoulder flexion, while the lower arm explores extension and internal rotation.
Develops Hip Mobility
The crossed-leg position challenges the hips through flexion and adduction.
Practicing with appropriate support can help students become more aware of their available range of movement without forcing the knees.
Encourages Better Postural Awareness
Maintaining an upright spine while working with the arms and legs requires coordination between the pelvis, spine, shoulders, and head.
This makes Gomukhāsana useful for exploring how different parts of the body influence one another.
Highlights Left-Right Differences
Many practitioners find that one side feels noticeably different from the other.
One arm may reach the upper back easily while the opposite arm struggles. One hip may feel more mobile than the other.
These differences can provide useful information for a yoga teacher or practitioner when planning future mobility work.
Gomukhāsana and Desk-Bound Posture
Modern lifestyles often involve long periods of sitting, computer work, and activities that keep the arms in front of the body.
Over time, this can influence how comfortable certain shoulder and hip movements feel.
Gomukhāsana can provide an opportunity to explore movements that are less common during daily activities.
The posture encourages awareness of the shoulders, chest, upper back, hips, and pelvis.
However, it should not be treated as a quick solution for poor posture. Postural health depends on many factors, including strength, mobility, movement habits, work environment, and overall physical activity.
Preparatory Poses for Gomukhāsana
A few preparatory movements can make the posture more accessible.
For the Shoulders
Before attempting the full arm position, practice:
- Gentle shoulder circles
- Strap shoulder movements
- Eagle arms
- Simple triceps stretches
- Chair Gomukhāsana arms
These movements can help you become familiar with the shoulder actions required in the pose.
For the Hips
For the legs, useful preparations include:
- Baddha Koṇāsana
- Gentle seated twists
- Comfortable hip-opening movements
- Supported seated positions
- Cross-legged hip mobility work
Practicing the leg position from a tabletop or all-fours position can also help some students understand how the knees and feet should be organised.
Using Props in Gomukhāsana
Props can change the experience of the posture considerably.
Block or Folded Blanket
Place a block or folded blanket beneath the sitting bones.
This can help maintain spinal length and make the hip position more accessible.
Yoga Strap
A strap is particularly useful for the arms.
Hold one end with the upper hand and the other end with the lower hand. Instead of trying to clasp the hands, gradually reduce the distance between them as shoulder mobility improves.
The strap should support the posture rather than pull the arms aggressively toward one another.
Chair Variation
A chair can be useful for practitioners who cannot comfortably sit on the floor.
The arms can still practice the Gomukhāsana position while the legs remain in a comfortable seated position.
This allows you to work on shoulder mobility without adding unnecessary stress to the hips and knees.
Common Mistakes in Gomukhāsana
Forcing the Knees to Stack
The knees do not need to stack perfectly.
Trying to force them into alignment can create excessive pressure around the knee joint.
Instead, prioritise comfortable hip movement and an even seated position.
Pulling the Hands Together
If your hands cannot reach, do not force them.
Use a strap and allow the shoulders to gradually develop greater mobility.
Rounding the Spine
Limited shoulder mobility can sometimes cause practitioners to collapse through the upper back.
Sit higher and reduce the intensity of the arm position if necessary.
The goal is to maintain a long spine while allowing the shoulders to move.
Flaring the Ribs
When reaching the upper arm overhead, some practitioners compensate by pushing the ribs forward.
Instead, maintain a lifted chest while keeping the lower ribs relatively controlled.
Ignoring One Side
Always practice both sides.
The difference between the two sides can be significant, and working both variations allows you to observe how your mobility changes.
Contraindications and When to Modify
Gomukhāsana requires considerable movement from the knees, hips, and shoulders. Practitioners with existing injuries or significant discomfort should modify the posture or choose another variation.
Extra care is appropriate with:
- Knee injuries
- Shoulder injuries
- Significant hip pain
- Neck problems
- Acute inflammation or pain
- Limited shoulder mobility that causes pinching
Sharp pain is a reason to come out of the pose.
If you experience discomfort around the knee, reduce the depth of the leg position or practice the arms separately. If the shoulder feels pinched, use a strap or work with the arms in a less demanding position.
When in doubt, practice under the guidance of an experienced yoga teacher or qualified healthcare professional.
Gomukhāsana Variations
Arms-Only Gomukhāsana
Practice the arm position while seated comfortably or standing.
This is an excellent option for students who want to explore shoulder mobility without placing the hips and knees into the full crossed-leg position.
Legs-Only Gomukhāsana
Keep the arms relaxed and focus entirely on the hip and leg position.
This allows you to explore the lower-body aspect of the posture without adding the demands of the shoulder bind.
Reclined Gomukhāsana Legs
A supine variation allows you to explore the crossed-leg action while lying on the back.
This can provide a more supported environment and is often useful toward the end of a practice.
Forward-Folding Gomukhāsana
Once the seated position feels stable, some practitioners may explore a gentle forward fold.
The movement increases the intensity around the hips, so maintain awareness of the sitting bones and avoid forcing the knees toward the floor.
Gomukhāsana in a Hatha Yoga Practice
Gomukhāsana fits naturally into a Hatha Yoga practice because it combines posture, breath, concentration, and physical awareness.
Rather than treating the pose simply as a flexibility exercise, a practitioner can use it to study the relationship between different areas of the body.
The hips influence the pelvis.
The pelvis influences the spine.
The spine affects the position of the shoulders.
The shoulders influence the arms.
Breath moves through the entire experience.
This integrated approach is one of the strengths of traditional Hatha Yoga practice.
For students completing a Hatha Yoga course, Gomukhāsana can also become a useful example of how a posture can be adapted for different bodies rather than taught as one fixed shape.
Gomukhāsana, Breath, and Awareness
The position of the arms can create a feeling of openness across the chest, while the seated posture provides a stable foundation for breath awareness.
Try to breathe slowly without forcing the chest upward or pushing the ribs forward.
Notice whether the breath feels different when the right leg is on top compared with the left.
Observe the shoulders.
Notice the areas of tension.
Pay attention to the places where you naturally try to compensate.
This turns Gomukhāsana into an exercise in observation rather than simply an attempt to achieve a particular shape.
Gomukhāsana and the Broader Practice of Yoga
Yoga postures become more meaningful when they are connected to awareness rather than treated purely as physical exercises.
Gomukhāsana offers several opportunities for this kind of practice.
The crossed legs challenge the hips.
The arm bind challenges the shoulders.
The upright spine requires stability.
The breath creates continuity.
Attention connects all of these elements.
This approach is particularly relevant to practitioners who are interested in the relationship between Hatha Yoga, Nada Yoga, meditation, and sound-based practices.
A physical posture can prepare the body for sitting, chanting, pranayama, or meditation. Likewise, sound and breath practices can deepen awareness of the body.
Gomukhāsana and Nada Yoga
Although Gomukhāsana is primarily a physical yoga posture, it can form part of a broader practice that eventually moves toward meditation and attentive listening.
In Nada Yoga, the practitioner develops awareness through sound. A stable seated posture can support this work by allowing the body to remain comfortable during longer periods of listening.
After practicing Gomukhāsana, a student might transition into a comfortable seated position for mantra, pranayama, or a period of sound meditation.
For students undertaking Nada Yoga teacher training, understanding how traditional postures support seated practices can help create a more integrated approach to yoga and sound.
The posture itself does not produce a special sound-related effect. Its value lies in preparing the body and developing the awareness needed for deeper practices.
Gomukhāsana in a Sound Healing Practice
Yoga postures and sound healing can complement one another when used thoughtfully.
A gentle Hatha Yoga sequence may prepare the body before a sound meditation or sound bath. After movement, practitioners can settle into a stable seated or reclined position and turn their attention toward sound.
This relationship is relevant for students exploring sound healing teacher training, where the practice may include yoga, meditation, breath awareness, mantra, and traditional Indian approaches to sound.
A sound healing course in Rishikesh can provide a broader context for understanding how movement, breath, meditation, and sound can work together within a contemplative practice.
The key is to understand the role of each practice rather than presenting every yoga posture as a sound healing technique.
A Simple Way to Practice Gomukhāsana
For a gentle home practice, begin by sitting on a folded blanket or block.
Cross the right leg over the left and adjust the feet until the position feels stable. Keep the knees comfortable rather than forcing them to stack.
Then bring the left arm overhead and the right arm behind the back. Use a strap if the hands do not meet.
Lengthen the spine and soften the shoulders.
Take five slow breaths.
Release the arms first, then uncross the legs.
Rest for a moment before changing sides.
Repeat the same process with the left knee on top and the right arm overhead.
Notice the differences between the two sides without trying to force them to become identical.
Final Thoughts
Gomukhāsana is a posture of coordination. Its crossed legs ask the hips to work within a relatively deep range, while the arm position challenges the shoulders through two very different movements.
That combination makes the pose valuable for exploring mobility, posture, balance, and body awareness.
It also makes patience essential.
The knees do not need to stack perfectly. The hands do not need to clasp behind the back. A strap, block, blanket, or chair can make the practice more accessible while preserving the essential actions of the posture.
Over time, the practice can become less about reaching the final shape and more about understanding the body within it.
That quality of observation is central to yoga.
Practice both sides.
Use support when needed.
Breathe steadily.
And allow the posture to develop through consistent practice rather than force.